
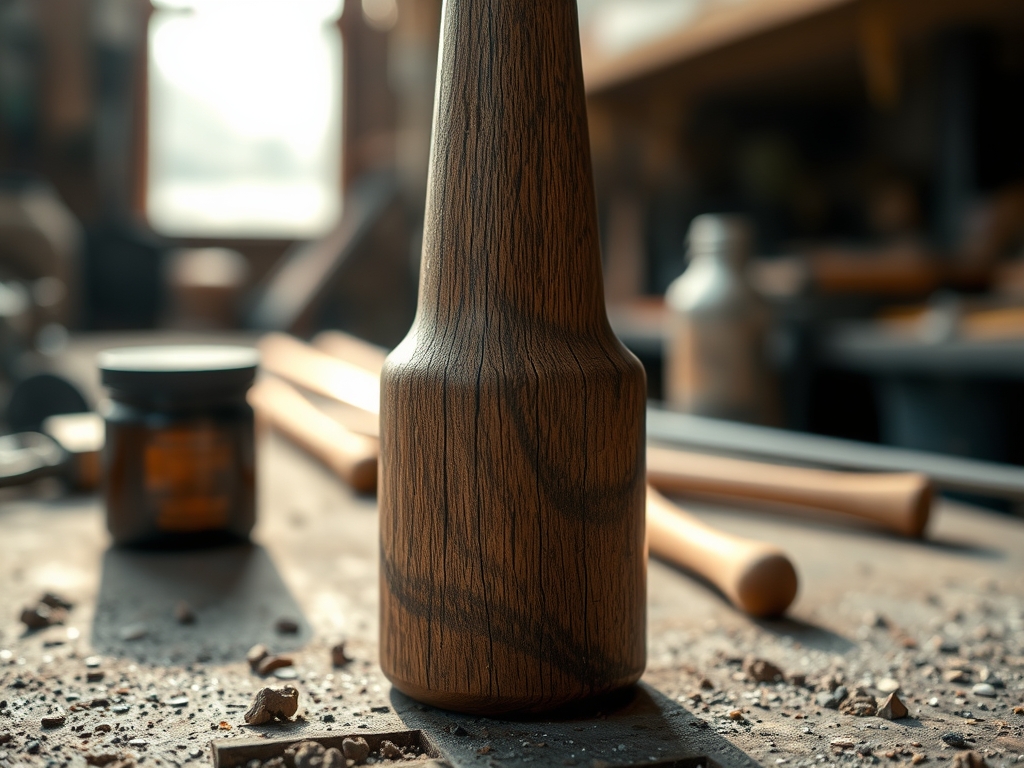
The scent of sun-drenched groves and heavy, golden lipids is currently filling my studio. There is something intensely tactile about running your thumb over the grain of a parched spoon. When you commit to Natural Olive Wood Care, you are not just cleaning a utensil; you are managing the structural integrity of a biological composite. Olive wood is incredibly dense, boasting a high Janka hardness rating, but its intricate, swirling grain patterns make it prone to micro-fissures if the moisture content drops too low. If you let that wood get thirsty, the internal tension shifts, and you will start seeing those heartbreaking radial cracks. We are here to stop the desiccation before it starts. By saturating the cellular structure with food-safe oils, we are essentially creating a hydrophobic barrier that keeps water out and prevents the fibers from fraying. It is a high-stakes game of molecular displacement. Grab your rags and your favorite board cream, because we are about to turn those dull, greyish spatulas back into gleaming, golden masterpieces of kitchen engineering.
THE STUDIO KIT

To execute a professional-grade restoration, you need more than just a bottle of oil. We are looking for high-viscosity, food-grade lubricants that can penetrate the porous surface of the wood without becoming rancid. My go-to is a pharmaceutical-grade mineral oil, though a high-quality fractionated coconut oil works wonders because the long-chain fatty acids have been removed, preventing oxidation. You will also need a burnishing tool or a very fine-grit sandpaper (think 400 to 600 grit) to smooth down any "raised grain" that occurs after washing.
For the application, skip the paper towels. You want a lint-free microfiber cloth or a piece of reclaimed cotton jersey. If you are feeling extra technical, grab a small caliper to measure the thickness of your boards; you would be surprised how much a piece can swell or shrink based on its hydration levels.
Material Substitutions: If you cannot find pure mineral oil, look for beeswax pellets to create a custom "board butter." Avoid using standard culinary olive oil for long-term storage, as the unsaturated fats will eventually oxidize and create a sticky, foul-smelling residue. If you lack a professional burnisher, the back of a stainless steel spoon can be used to compress the wood fibers and create a slick, reflective finish.
THE TEMPO
The "Maker's Rhythm" for wood maintenance is less about speed and more about capillary action. You cannot rush physics. The initial cleaning and de-fuzzing phase takes about fifteen minutes of active work. However, the saturation phase requires a "rest and soak" period of at least four to six hours. I prefer to let my tools cure overnight. This allows the oil to migrate from the surface deep into the heartwood. If you apply oil and immediately wipe it off, you are only treating the top micron of the material. Think of it as a slow-motion infusion. Your total active "hands-on" time is low, but the total project duration is roughly twelve hours to ensure the oil has fully stabilized within the grain.
THE CORE METHOD
1. The Surface Debridement
Before any oil touches the wood, the surface must be surgically clean and smooth. Use a damp cloth to wipe away debris, then use your fine-grit abrasive to lightly sand the surface. This removes the "fur" or loose cellulose fibers that have been pulled up by previous water exposure.
Mastery Tip: This process utilizes abrasive leveling to ensure that the oil penetrates evenly. If you leave those loose fibers, they will act like tiny wicks, drawing moisture into the wood even after you have oiled it.
2. The Thermal Prep
Lightly warm your oil in a double boiler or a warm water bath. You are looking for a temperature around 100 degrees Fahrenheit. Warm oil has a lower viscosity, which allows it to flow more easily into the microscopic pores of the olive wood.
Mastery Tip: This relies on the principle of thermal expansion. As the oil warms, its molecules move faster and the liquid becomes thinner, increasing its ability to penetrate deep into the dense, interlocking grain of the olive wood.
3. The Flood Application
Apply a generous amount of oil to the wood until it looks "wet." Do not just wipe it on; flood the surface. Use your cloth to move the oil around, ensuring that the end-grain sections (the thirstiest parts of the tool) are completely saturated.
Mastery Tip: Pay attention to surface tension. You want the oil to "wet out" the surface completely. If the oil beads up, it means there is still a wax coating or a contaminant blocking the path to the fibers.
4. The Compression Burnish
Once the oil has soaked in for a few hours, take your burnishing tool or a clean, dry cloth and rub the wood vigorously. The friction creates heat, and the pressure helps "lock" the oil into the fibers while smoothing the surface to a mirror-like sheen.
Mastery Tip: This stage involves mechanical fiber compression. By rubbing the wood, you are flattening the cellular walls of the tracheids, which creates a harder, more water-resistant exterior shell.
THE TECHNICAL LEDGER
Maintenance & Longevity: To keep your tools in peak condition, perform this deep-oil treatment every three months. For daily maintenance, never leave your wood submerged in water. The differential pressure caused by soaking can lead to warping as the wood cells expand at different rates.
Material Variations:
- Sustainable: Reclaimed olive wood often has higher character but more "voids" that require extra oil.
- Premium: High-contrast "marble" grain olive wood is denser and requires more frequent, lighter oiling to prevent surface checking.
- Recycled: If you are restoring an old thrifted board, use a scraper tool first to remove the top layer of oxidized wood before starting the oiling process.
The Correction:
- The Sticky Residue: If you used the wrong oil and it turned gummy, use a solution of white vinegar and coarse salt to scrub the surface back to raw wood, then start over with mineral oil.
- The Fuzzy Surface: If the wood feels rough after oiling, you skipped the sanding step. Wait for the oil to dry, sand it back with 600 grit, and re-apply a light coat.
- The Odor Trap: If your board smells like onions, use a lemon half and salt to neutralize the organic compounds before sealing it with oil.
Studio Organization: Store your oiled tools in a vertical rack with plenty of airflow. Never stack damp or freshly oiled boards horizontally on top of each other; this creates an anaerobic environment where mold can thrive between the layers.
THE FINAL REVEAL
Look at that glow! When you finish a proper session of Natural Olive Wood Care, the transformation is nothing short of cinematic. The dull, chalky surface is replaced by a deep, amber translucency that reveals the complex history of the tree. The wood feels heavy, cool, and incredibly smooth to the touch. It no longer feels like a "thing" you use to cook; it feels like a precision instrument. You have successfully manipulated the material physics of the wood to ensure it survives another decade of service. It is functional art at its finest.
STUDIO QUESTIONS
Can I use vegetable oil for wood care?
No. Vegetable oils like canola or corn contain polyunsaturated fats that oxidize over time. This process, called rancidification, creates a sticky, foul-smelling film that can harbor bacteria and ruin your expensive olive wood tools.
How often should I oil my olive wood?
Frequency depends on usage and climate humidity. A good rule of thumb is to apply oil whenever the wood begins to look pale or feels "dry" to the touch. For most active kitchens, this occurs every 4 to 8 weeks.
Why did my wood spoon crack?
Cracking is usually caused by rapid desiccation. When wood loses moisture too quickly or unevenly, the internal tensile forces exceed the strength of the wood fibers, causing a structural failure or "check" along the grain line.
Is mineral oil safe for food contact?
Yes, provided you use "Food Grade" or "White Mineral Oil." It is a non-toxic, inert substance that does not go rancid. It is widely used in the food industry to protect wooden surfaces from moisture and bacterial penetration.

