
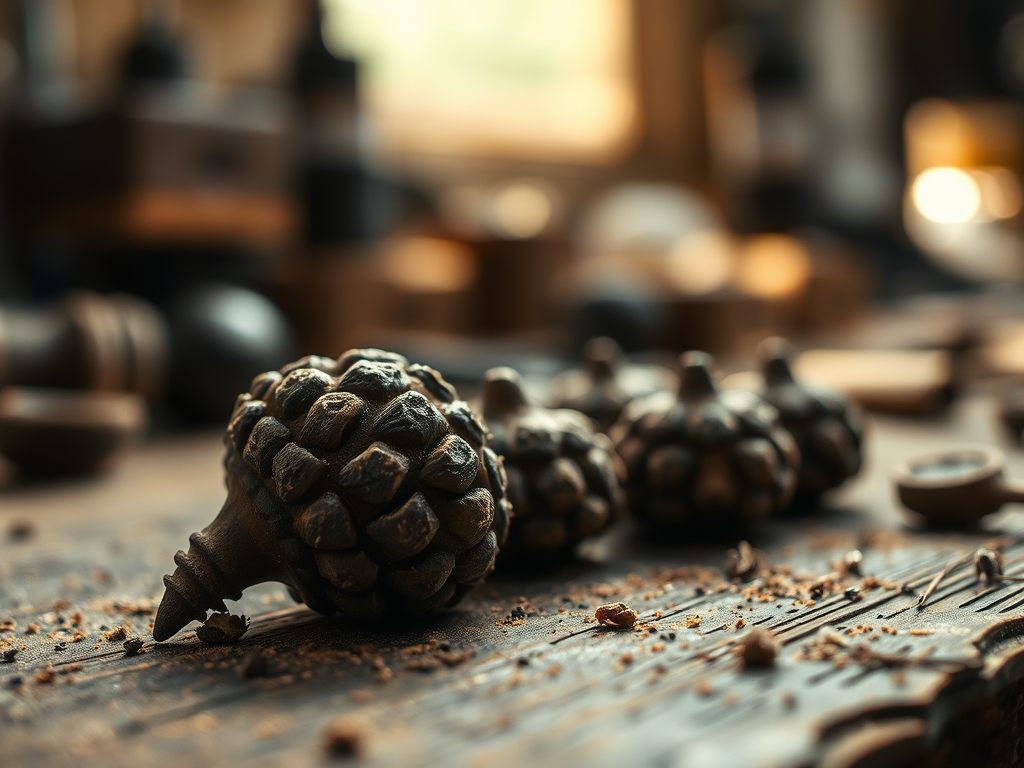
Crunching through the leaf litter in late October feels like walking on a layer of crisp, dehydrated parchment. You can hear the structural failure of the dried oak leaves with every step. I am currently obsessed with the architectural perfection of the forest floor. We are Foraging For Acorn Caps to serve as the structural foundation for our miniature woodland vessels. These caps are marvels of natural engineering; they feature a cross-hatched lignified texture that provides incredible grip for adhesives. When you hold a fresh cap, you can feel the tactile density of the wood fibers. It is not just a hat for a nut. It is a cupule, a hardened involucre that protects the seed during its developmental phase. The tensile strength of these tiny domes is surprisingly high due to the interlocking cellular matrix. We are looking for caps that have shed their nuts but retained their structural integrity. Avoid any with visible exit holes from weevil larvae; those have compromised interior walls. We want the heavy, thick-walled specimens from Red Oaks for our high-end studio builds.
THE STUDIO KIT
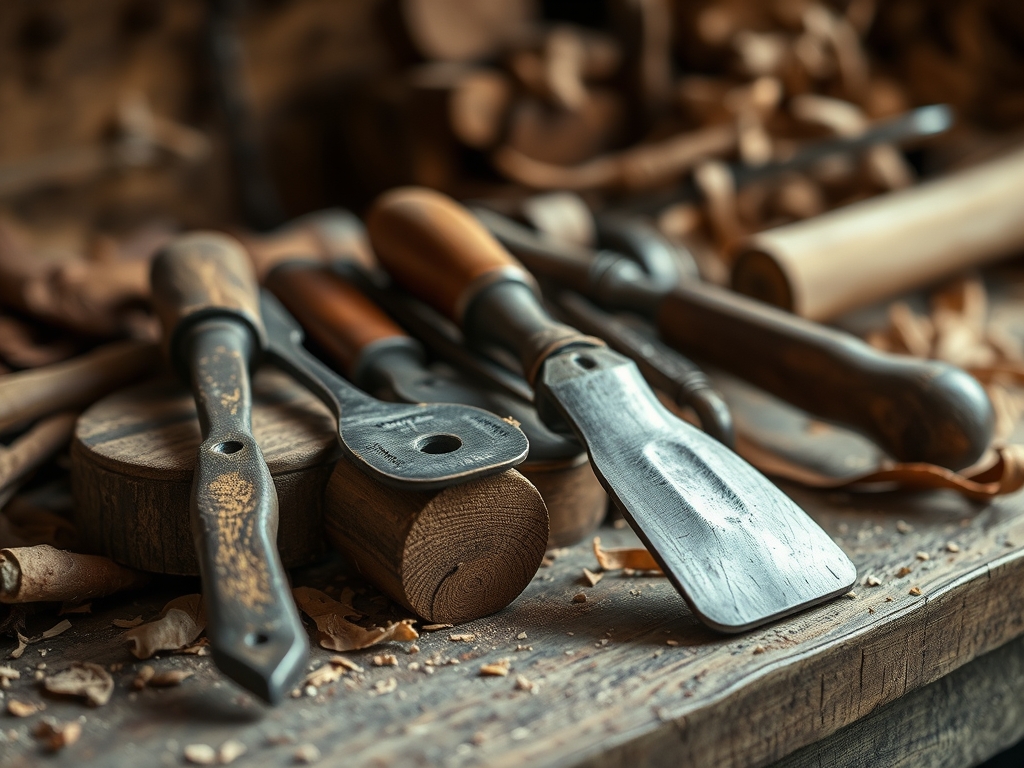
To transform these raw forest finds into archival-quality art, your workbench needs more than just glue. You need a jeweler's saw with a fine-toothed blade to level the rims without shattering the brittle edges. I also keep a set of digital calipers nearby to measure the diameter of each cap; consistency is key when you are creating a matched set. For the interior refinement, a tungsten carbide burr on a rotary tool allows you to smooth out the rough attachment point where the nut once sat.
You will also need a high-viscosity cyanoacrylate or a specialized wood glue with a high solids content. If you cannot find the perfect oak caps, look for Material Substitutions like the husks of beech nuts or the woody cones of an alder tree. These offer similar porous surfaces that bond well with resins. Always keep a bone folder and a fine-point awl on hand for manipulating delicate fibers and clearing out debris from the deep crevices of the cap texture.
THE TEMPO
The Maker's Rhythm for woodland crafting is dictated by the moisture content of your finds. You cannot rush the hygroscopic stabilization of organic material. Phase one is the collection and cleaning, which takes about an hour of focused foraging. Phase two is the dehydration and stabilization period. This takes 48 to 72 hours in a low-humidity environment to ensure the internal moisture drops below eight percent. If you skip this, your finished piece will shrink and crack as the cells collapse. The actual assembly and detail work is the "Flow State" phase, usually requiring two to three hours of precision bench time. Respect the drying curve; the wood fibers need time to reach equilibrium with your studio air before you apply any sealants or structural bonds.
THE CORE METHOD
1. Thermal Stabilization
Before any cutting happens, you must neutralize potential biological hitchhikers. Place your caps on a baking sheet at 175 degrees Fahrenheit for 45 minutes. This low-heat treatment serves two purposes: it kills larvae and accelerates the evaporation of free water within the porous cell walls. Mastery Tip: This process utilizes thermal kinetic energy to drive out moisture without reaching the combustion point of the lignin. It ensures your project will not sprout mold or harbor insects once it is displayed on a shelf.
2. Interior Excavation and Leveling
Use your rotary tool with a sanding drum to remove the residual debris inside the cup. You want to expose the fresh, lighter wood beneath the weathered surface. Next, use a jeweler's saw to trim the top rim if it is jagged. Mastery Tip: Always cut perpendicular to the grain direction to prevent long-run splitting. By leveling the rim, you increase the surface area available for bonding, which utilizes capillary action to pull the adhesive deeper into the wood fibers for a permanent hold.
3. Surface Burnishing and Sealing
Once the cap is shaped, use a bone folder or a high-grit sanding stick to burnish the exterior. This flattens the microscopic wood fibers and creates a natural sheen. Finish the piece with a thin coat of matte archival sealant. Mastery Tip: A sealant with a low molecular weight will penetrate the intercellular spaces more effectively than a thick topcoat. This creates a moisture barrier that prevents the cap from expanding or contracting with seasonal humidity changes, maintaining the structural integrity of your joinery.
THE TECHNICAL LEDGER
Maintenance & Longevity: To keep your woodland miniatures from becoming brittle, avoid direct UV exposure. Ultraviolet light breaks down the lignin bonds in the wood, leading to "silvering" and eventual structural failure. A light application of microcrystalline wax every two years will keep the fibers supple.
Material Variations:
- Sustainable: Foraged caps from urban parks.
- Recycled: Repurposed vintage wooden beads used as "nuts" inside the caps.
- Premium: Rare Bur Oak caps, which feature a "mossy" fringe that adds incredible visual complexity.
The Correction:
- The Split: If a cap cracks during drilling, do not toss it. Use a "thin" grade cyanoacrylate to wick into the crack. The surface tension will pull the glue into the break, welding it shut.
- The Over-Sand: If you sand the rim too thin, the tensile strength drops. Reinforce the interior with a thin layer of epoxy putty.
- The Glue Fog: If your adhesive leaves a white residue, it is likely due to high humidity during curing. A tiny drop of mineral oil on a microfiber cloth will clear the "bloom" instantly.
Studio Organization: Store your processed caps in airtight glass jars with a small desiccant pack. This prevents the wood from re-absorbing atmospheric moisture, which can cause the caps to warp or lose their ergonomic fit in your jigs.
THE FINAL REVEAL
There is nothing quite like the weight of a finished woodland vessel in the palm of your hand. It feels substantial, a tiny piece of the forest floor elevated to a work of art. The contrast between the rugged, scaled exterior of the acorn cap and the glass-smooth, burnished interior is a masterclass in texture. When you get the gauge of the materials just right, the piece feels balanced and intentional. You have taken a piece of biological waste and turned it into a specimen of precision engineering. It is smart, it is sustainable, and the detail is absolutely hypnotic.
STUDIO QUESTIONS
How do I stop acorn caps from cracking?
Slowly dehydrate them in a low-heat oven to stabilize the lignin. Rapid drying causes the cell walls to collapse unevenly, leading to structural fractures. Applying a thin coat of stabilizing resin or wax after drying further protects the tensile strength.
What is the best glue for Foraging For Acorn Caps?
Use a high-viscosity cyanoacrylate or a specialized wood glue. These adhesives interact with the porous surface of the wood, creating a mechanical bond. The high solids content ensures the glue fills the microscopic gaps in the grain direction.
Can I use fresh green acorn caps?
No, green caps have a high internal moisture content. As they dry, they will shrink significantly and warp. This change in dimensions will ruin your joinery and cause any rigid adhesives to fail as the wood pulls away.
How do I clean the rough texture of the cap?
Use a stiff nylon brush or a brass wire brush for deep cleaning. This removes loose organic matter without damaging the structural integrity of the scales. For stubborn dirt, a quick dip in isopropyl alcohol will displace grime and evaporate quickly.
What tools are best for detailing tiny caps?
A jeweler's saw is essential for precision cuts, while a rotary tool with diamond burrs handles the interior shaping. Use digital calipers to ensure your measurements are precise, especially when fitting caps to other components or bases.

